By Andrew Hoog | June 4, 2011
Android Forensic Techniques
NOTE: This chaper is from my book “Android Forensics: Investigation, Analysis, and Mobile Security for Google Android” published by Syngress in 2011. Syngress authorized me to publish the chapter Android Forensic Techniques online. If you find the content helpful, please consider purchasing the book.
Chapter sections:
- Introduction
- Procedures for handling an Android device
- Imaging Android USB mass storage devices (coming soon)
- Logical techniques (coming soon)
- Physical techniques (coming soon)
Procedures for Handling an Android Device
One major challenge for forensic analysts is to devise a protocol for handling the device prior to the analyst taking direct custody. And this is certainly not a new issue for analysts as others involved in the investigation may also handle other digital devices such as computers or laptops. However, mobile devices are still relatively new and are often not handled properly by first responders. There is a tendency to immediately examine the device, which almost inevitably results in data modification and potential loss of access to the device.
Securing the Device
Many agencies and first responders have established a protocol for securing evidence. The following sections are meant to complement the existing proce- dures, not replace them. Of course, these represent special procedures, and educating first responders who have many other responsibilities can be quite challenging.
Pass Code Procedures
Pass code locked devices are becoming more common as a result of heightened security awareness in consumers and corporations. In the next section, we cover some specific techniques to circumvent pass codes. However, it is not always possible. The first consideration when obtaining information from a device is whether an opportunity exists to immediately disable or otherwise circumvent the pass code.
If you encounter an Android device and the screen is active, strong consideration should be given to checking and potentially changing its settings. For devices that have pass codes, there is a short period of time (from less than a minute up to about 15 min) where full access to the device is possible without re-entering the pass code. If a device is in this state, there are several steps to consider:
- Increase the screen timeout to prevent or postpone the screen locking. The location for this setting is not consistent between Android versions and devices. For example, on a G1 running Android 1.5, the timeout can be set by pressing Menu (from the home screen), then Settings, Sound & display, Screen timeout, and then select “Never timeout.” On an HTC Incredible running Android 2.2, press Menu (from the home screen), then Settings, Security, Lock phone after, and then finally “15 minutes.” As long as the device has some nominal activity in the allotted timeout setting, it will remain accessible.
- Enable USB debugging and “Stay awake” settings. The location for this setting has remained consistent in devices and can be accessed by pressing Menu (from the home screen), then Settings, Applications and Development. From there, you can check USB debugging and Stay awake. If you select the “Stay awake” setting and then connect it to a charge, the device will never go to sleep, which is effective in preventing the screen lock. By enabling USB debugging, the device can be accessed over USB enabling data extraction.
Of course, these steps are making changes to the device and should be thoroughly logged in the case notes describing the state of the device, the rationale for the attempted changes, and the outcome of each change. This will not only assist in future report writing but will likely be an important factor if your decision to change the device is challenged in court.
To make matters more difficult, it is also important to minimize touching the screen in case the screen lock becomes active. As we will discuss shortly, it is sometimes possible to determine the pattern lock of a device by enhancing photo- graphs of the device’s screen. The lesser the interaction a first responder has with the screen, the higher the success rate of this technique.
Network Isolation
As many examiners likely know, it is important to isolate the device from the network as soon as possible. In the worst-case scenario, a remote wipe could be initiated on the device which, if successful, would prevent the recovery of any data. While most remote wipes are done over the data network, some can be triggered over SMS, and hence ensure the device is fully isolated to prevent remote wipes. In other circumstances, additional messages on the device could be received or even removed by triggers outside your control. As the goal of a forensic image is to preserve the state of the device for additional analysis, any changes should be avoided.
There are a number of ways to isolate a device from the network and each of these methods have advantages and disadvantages. Table 6.1 summarizes the advantages and disadvantages of each technique. As you can tell, isolating an Android device from the network is not an easy task and each option has advantages and disadvantages. While each examiner or their organization should determine the appropriate steps to undertake, the best option is probably placing the device in Airplane mode. This varies slightly between Android devices and versions but the general approach is the same:
- Press and hold the Power off button and select Airplane mode.
- Press Menu (from the home screen), then Settings, then the Wireless option which is generally near the top. Some examples are “Wireless controls” or “Wireless and networks.” The next menu should present the Airplane mode option.

Figure 6.1 Airplane mode via the Power off button
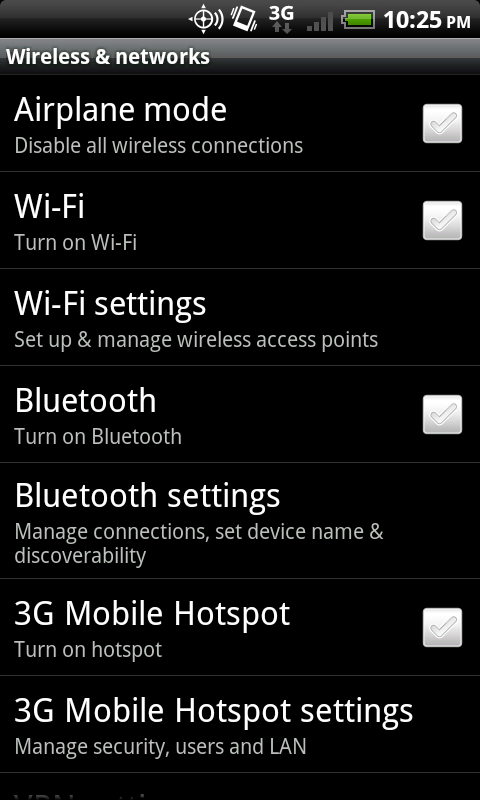
Figure 6.2 Airplane mode via the Wireless and networks settings.
Table 6.1 Techniques for Device Isolation
| Technique | Advantages | Disadvantages |
|---|---|---|
| Put the device in Airplane mode. This recess that you have full access to the Settings menu. | The Device continues running and temporal data remains intact. Disables cellular data network as well as Wi-Fi.com. | You are modifying the device setting further. Only works if you have full access to the device. |
| If the phone is a GSM phone, remove the SIM card. | Easy to remove, effective in disabling all cellular voice, SMS, and data transmissions. | Does not disable Wi-Fi.com or other networks. Does not work on non-GSM phones including CDA and Den phones. |
| Suspend account with wireless carrier. Effective in disabling all cellular voice, SMS, and data transmissions for any phone. | Process may take some time and require a court oder. | Does not disable Wi-Fi.com or other networks. |
| Place device in a shielded bag, box, tent, or room. | Faraday shields prevent various types of network transmissions and can be an effective approach if you cannot utilize any of the previous options. | There is some debate about the effectiveness of portable Faraday shields, notably Faraday bags. Also, while the transmissions are blocked, the device attempts to contact the cellular network repeatedly thus draining the batter quickly. Cords cannot be inserted into the enclosure as they will transmit signals. A shielded room dedicated for mobile examinations is ideal. However, they are quite expensive to build and maintain. |
| Turn the device off. | Completely effective in preventing all network transmissions. | The device state is modified and temporal data is lost. Pass code on reboot could be enabled, thus restricting access to the device. |
Regardless of which technique you ultimately choose, the main goal should be to isolate the device from the network as soon as possible.
Power and Data Cables
While most forensic labs will have the cables necessary to charge and connect the device, it is always prudent to seize the cables directly from the scene. It’s possible that a newer device is in use and the forensic toolkits do not yet have an appropriate cable. For example, a new specification for connecting media devices was developed called portable digital media interface (PDMI) and is integrated into two Android tablet devices, the Dell Streak and the Samsung Galaxy Tab. The PDMI interface provides not only power and high-resolution video output, but also offers USB 3.0 support. Whereas the actual examination of one of these devices could be delayed while an appropriate cable is acquired, if it needed charging and you do not have the appropriate cable, the loss of power will result in the loss of temporal data.
Powered-off Devices
If a device is already powered off when you encounter it, the best option is to boot it into recovery mode to test for connectivity and root access. The owner may have already enabled USB debugging or have rooted the device, so you may have access to the data without booting into normal operational mode.
This approach is similar to performing forensics on a standard computer hard drive. The last thing any trained forensic analyst would do is boot the computer to determine what operating system is installed. Instead, the hard drive is removed and connected to a write blocker for imaging to prevent any changes to the evidence. Similarly, if a mobile device does not have to boot into normal mode, there is no need to do so as this may make changes to the device. Specific information on how to test a device in recovery mode for sufficient privileges is discussed later in this chapter.
How to Circumvent the Pass Code
The ability to circumvent the pass code on an Android device is becoming more important as they are utilized frequently and, in most cases, do not allow data extraction. While there is no guaranteed method, there are a number of techniques which have worked in certain situations.
As previously discussed, there are three types of pass codes Android devices currently support. The first is a pattern lock. This was the default on the initial Android devices. To access the device, the user draws a pattern on the locked phone and, if drawn properly, the device is unlocked. An example of a pattern lock on an HTC Incredible is shown in Fig. 6.3.
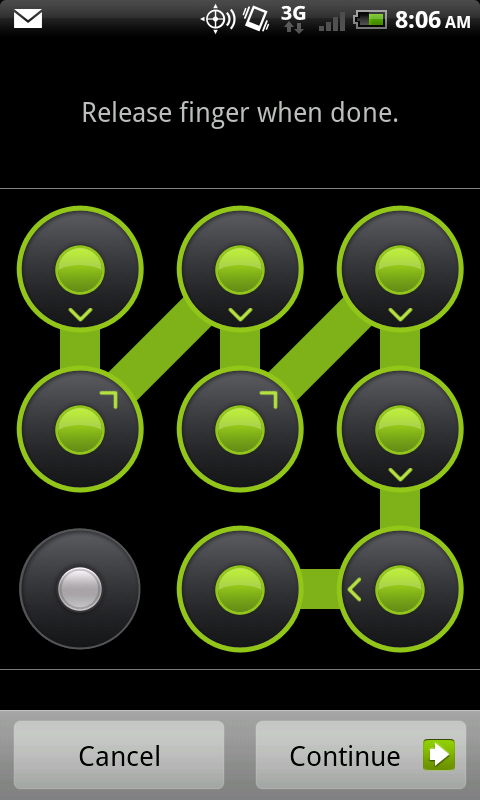
Figure 6.3 Android pattern lock
The second type of pass code is the simple personal identification number (PIN) which is commonly found on other mobile devices. Fig. 6.4 is an example of a PIN- enabled HTC Incredible.

Figure 6.4 Android PIN lock
The final type of pass code currently found on Android devices is a full, alphanumeric code, as shown in Fig. 6.5.
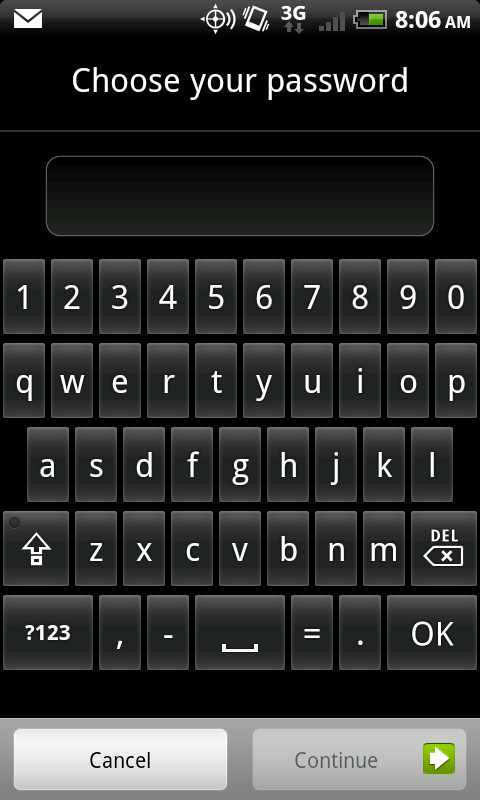
Figure 6.5 Android alphanumeric lock
As discussed in Chapter 4, not all pass codes were created equal. The most effective pass code is one that allows or requires an alphanumeric password, as these are far more difficult to circumvent.
Utilize ADB if USB Debugging is Enabled
The first technique you should attempt, provided the phone is powered on, is to connect with the Android Debug Bridge (ADB) over USB, which was covered extensively in Chapter 3. Whereas only a fraction of Android devices will allow an ADB connection through the USB debugging setting, it is certainly worth trying as it easily provides sufficient access for data extraction. The most common reasons for which users enable USB debugging include:
- App development and testing
- Certain apps require this setting, such as PDAnet, which allows the device to provide Internet access to a tethered device over USB
- Custom ROMs
- Developer phones such as Google’s Android developer phone (ADP1)
- Device hacking
It is quite simple to determine if USB debugging is enabled, provided you are using the Ubuntu virtual machine (VM) or have a forensic workstation with a properly installed and configured Software Development Kit. With the phone running in normal mode, plug it into the Ubuntu VM. From the command prompt type “adb devices.” If USB debugging is enabled, the ADB daemon will return the device serial number along with the mode that the phone is presently in.
ahoog@ubuntu:~$ adb devices
List of devices attached
    HT08XHJ00657    device
If it is disabled, it will not return anything when the “adb devices” command is entered.
    ahoog@ubuntu:~$ adb devices
    List of devices attached

    ahoog@ubuntu:~$
Remember to pass the device through to your VM if you are running the command inside a virtual workstation. If the VM can’t see the device, you will get the same result as if the USB debugging were not enabled. Once you verify that the USB connection is passed through to the Ubuntu VM, you can execute the lsusb command to verify that the operating system is aware of the connection:
ahoog@ubuntu:~$ sudo lsusb -v
    [sudo] password for ahoog:

    Bus 001 Device 005: ID 0bb4:0c9e High Tech Computer Corp.
    Device Descriptor:
    bLength             18
    bDescriptorType     1
    bcdUSB              2.00
    bDeviceClass             0 (Defined at Interface level)
    bDeviceSubClass      0
    bDeviceProtocol      0
    bMaxPacketSize0      64
    idVendor                0x0bb4 High Tech Computer Corp.
    idProduct               0x0c9e
    bcdDevice               2.26
    iManufacturer           1 HTC
    iProduct                2 Android Phone
    iSerial                 3 HT08XHJ00657
    bNumConfigurations   1
    <snip>
    Interface Descriptor:
        bLength            9
        bDescriptorType    4
        bInterfaceNumber      1
        bAlternateSetting      0
        bNumEndpoints      2
        bInterfaceClass        255 Vendor Specific Class
        bInterfaceSubClass   66
        bInterfaceProtocol     1
            iInterface                    4 ADB
            <snip>
In this example, emphasis was placed on several areas that clearly show the Android device is connected and, in such cases, we can see an ADB interface is exposed. If the device is connected but you cannot connect via ADB, you should also kill your local ADB daemon and then start it again. This is easily accomplished as follows:
ahoog@ubuntu:~$ adb kill-server
    ahoog@ubuntu:~$ adb devices
    * daemon not running. starting it now on port 5037 *
    * daemon started successfully *
    List of devices attached
    HT08XHJ00657    device
If the USB debugging is enabled, a forensic analyst can use the interface to gain access and perform a logical recovery of the device, which is covered in detail later in this chapter.
Smudge Attack
Initially, Android devices used the pattern lock for pass code protection instead of a numeric or alphanumeric code. A recent paper entitled “Smudge Attacks on Smartphone Touch Screens” by the University of Pennsylvania Department of Computer and Information Science demonstrated a technique for accessing pattern locked Android devices by enhancing photographs of the screen (Aviv, Gibson, Mossop, Blaze, Smith, n.d.). The paper’s summary states:
Our photographic experiments suggest that a clean touch screen surface is primarily, but not entirely, reflective, while a smudge is primarily, but not entirely, diffuse. We found that virtually any directional lighting source that is not positioned exactly at a complementary angle to the camera will render a recoverable image of the smudge. Very little photo adjustment is required to view the pattern, but images generally rendered best when the photo capture was overexposed by two to three f-stops (4 to 8 times “correct” exposure).
If care was taken by the first responders to minimize contact with the device’s screen, this recovery technique may be viable. As an example of what is possible, Fig. 6.6 shows photos of the same Android device displayed side by side. The same original photo was used for both images but the image on the right was enhanced as part of the smudge attack process to highlight the contact points.
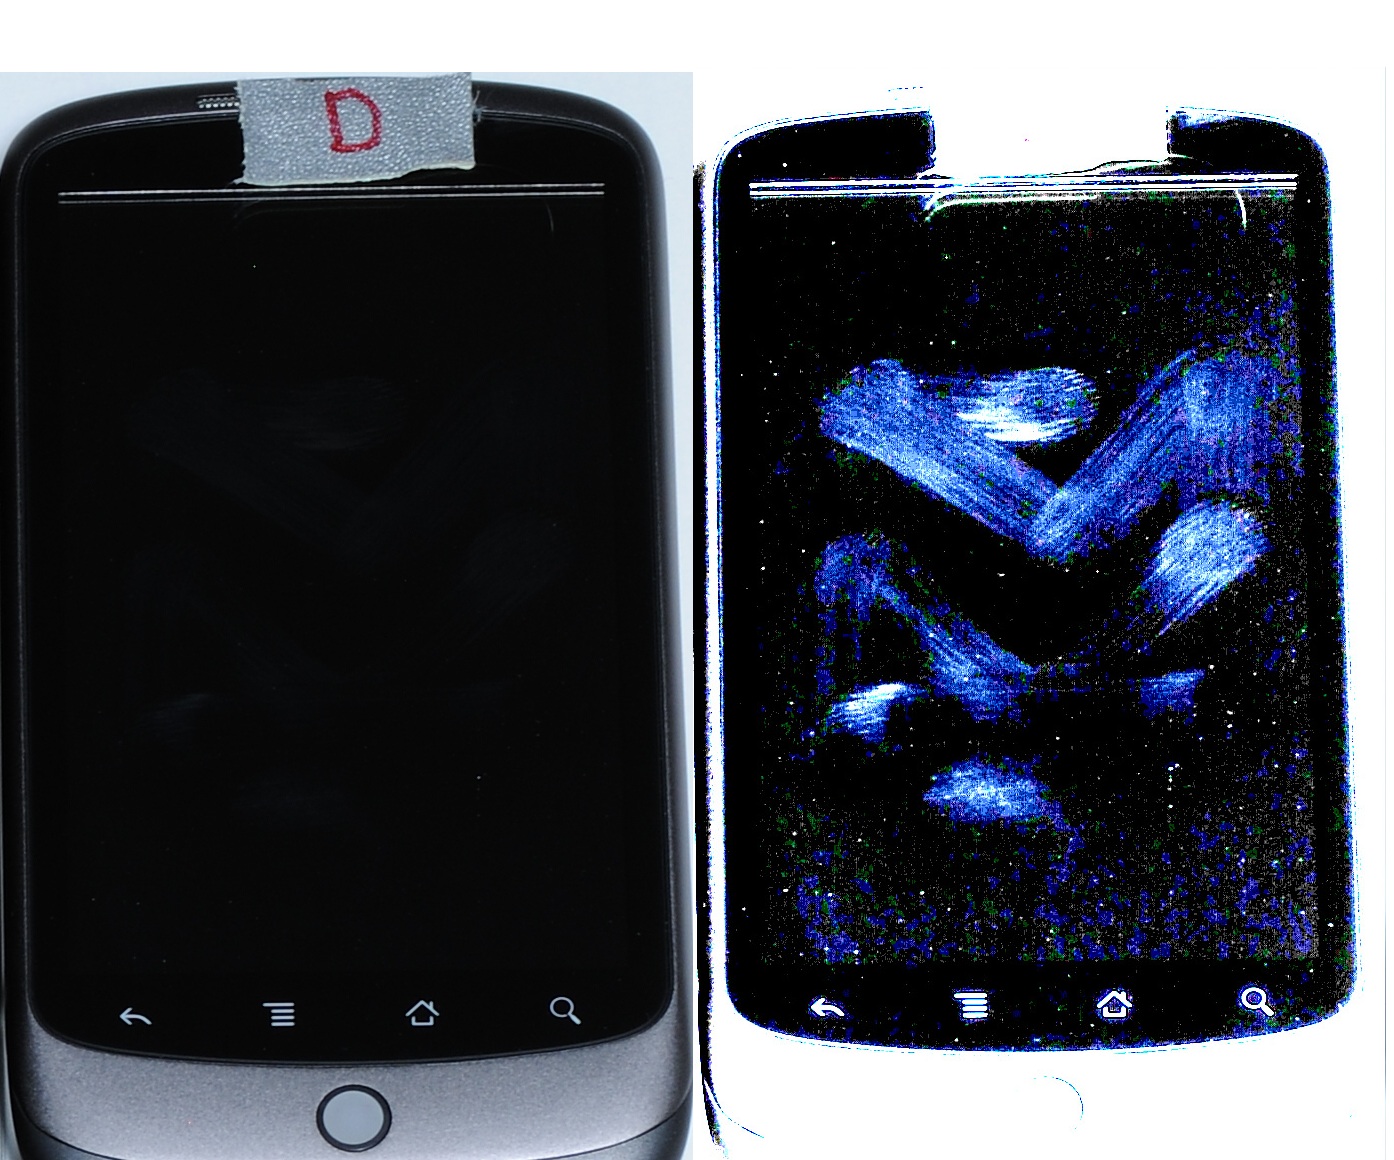
Figure 6.8 Enhanced photo showing smudge attack
Recovery Mode
Some users install a custom ROM which usually enables root access to the device through a modified recovery mode. Most custom ROMs install a modified recovery partition which simplifies the process used to install the custom ROM. There are several popular recovery partitions that are primarily used with custom ROMs and both offer shell access with root privileges from within the recovery console itself. As the phone is not booted into normal mode, the pass code is circumvented and the user data partitions can be mounted read-only, thus preventing changes to that area.
Table 6.2 Key Combinations to Boot into Recovery Mode
| Device | Key Combination |
|---|---|
| HTC G1 | Hold home button and press power button. Use volume down to select RECOVERY and press power key. |
| Nexus One | Hold volume down and press power button |
| Motorola Droid | Hold X key and press power button. |
| HTC Incredible | Hold volume down and press power button. Use volume down to select RECOVERY and press power key. |
Forensic analysts should attempt to boot into recovery mode if the device is powered off, when they take custody. If, instead, the device is running and a pass code is present, you should first attempt to connect via ADB and consider smudge attack. If neither of these is successful, you should then try to reboot into recovery mode. Like many other techniques, recovery mode is accessed in different ways depending on the device manufacturer and model. Table 6.2 covers the key combinations to access recovery mode on the phones referenced throughout this book. Each assumes the device is powered off already.
Once in recovery mode, you can connect the device to your Ubuntu workstation and attempt to connect using ADB. If the device is running a nonmodified recovery mode, the connection will fail. The screen generally shows a triangle with an exclamation point inside it and often a small Android device next to it. On other devices, you will be presented with the somewhat famous three Androids on a skateboard. Finally, other recovery modules clearly show they are in modified recovery code and provide a wide range of device options.
Flash a New Recovery Partition
There are a number of protocols, utilities, and devices that allow a skilled examiner to flash the recovery partition of a device with a modified image. The first available protocol supporting this approach was fastboot. Fastboot is a NAND flash update protocol executed over USB while in bootloader mode. Most devices ship with bootloader protection enabled, which prohibits the use of this protocol. However, it is possible that the protection has been disabled. To determine if bootloader protection is enabled, you must access the bootloader and look at the signature information, which will indicate S-ON or S-OFF. The S represents security, and so S-ON, the default production build, has security enabled; S-OFF indicates security is not enabled. Some devices ship with S-OFF, such as the Google Nexus One, as it is preloaded with Google’s Engineering SPL/Bootloader.
Other rooting techniques also disable this protection, so checking this on a pass code protected device may yield results. You can access the main bootloader using the first part of the key combinations in Table 6.2 in the previous section.
Fastboot does not require USB debugging to access the device. Hence, like recovery mode, it can be used to gain access to the device’s data. Once the new recovery partition is available, the device should be rebooted into recovery mode and forensic imaging can take place.
Other techniques exist which allow the recovery partition to be flashed with a new image. Some examples include:
- Motorola’s RSD Lite
- sbf_flash
- Samsung’s Odin Multiloader
While these utilities and protocols may ultimately provide the privileges that a forensic analyst requires, there is considerable effort required to not only locate and test the techniques but to understand them sufficiently to use them in a forensic investigation.
Screen Lock Bypass App
Security researcher Thomas Cannon recently developed a technique that allows a screen lock bypass by installing an app through the new web-based Android Market (Cannon, T., n.d.). Cannon’s technique utilizes a new feature in the web- based Android Market that allows apps to be installed directly from the web site. As such, you must have access to the Android Market using the primary Gmail user name and password for the device, which may be accessible from the primary computer of the user. Alternatively, you could access the Android Market if you knew the user name and password and had sufficient authority. Changing the user’s Gmail password would not work in this instance.
Cannon explains the technique on this web site as in the following section (Cannon, T., n.d.).
How it Works
The procedure is quite simple really. Android sends out a number of broadcast messages which an application can receive, such as SMS received or Wi-Fi.com disconnected. An application has to register its receiver to receive broadcast messages and this can be done at run time, or for some messages, at install time. When a relevant message comes in, it is sent to the application and if the application is not running it will be started automatically.
After testing out various broadcast messages the best one I found for the purpose of this utility was android.intent.action.PACKAGE_ADDED. This exists in all APIs as version 1 and is triggered when an application is installed. Hence, to get the application to execute remotely, we first deploy it from the Android Market, then deploy any other application that will cause the first one to launch.
Once launched it is just a matter of calling the disableKeyguard() method in KeyguardManager. This is a legitimate API to enable applications to disable the screen lock when, say, an incoming phone call is detected. After finishing the call the app ought to enable the screen lock again, but we just keep it disabled.
This technique is certainly worth consideration if you have proper access to the Android Market.
Use Gmail User/Pass
On most Android phones, you can circumvent the pass code if you know the primary Gmail user name and password registered with the device. After a number of failed attempts (ten attempts on the G1), you will be presented with a screen that asks if you forgot your pass code. From there, you can enter the Gmail user name and password and you will then be prompted to reset the pass code. This technique does not require the phone to be online as it uses credential information cached on the phone.
If you do not have the current Gmail user name and password, but have sufficient authority (i.e., court order) to reset the password, you could attempt to compel Google to reset the account password. You would then have to connect the Android device to the network and gain access. This issue presents many challenges, including the need to place the device online, putting it at risk for remote wipe in addition to making changes to the device. Reports on various law enforcement mailing lists indicate this technique does not always work.
If this approach is attempted, additional research is warranted. In particular, it would be prudent to control the Internet connection the device uses, most likely a Wi-Fi.com access point. You could then limit the network access to only those which the Google server needed for authentication. In addition, a detailed network capture of test devices should be analyzed as well as the actual changes made to the device.
JTAG and Chip-off
At this time, most Android devices do not encrypt the contents of the NAND flash, which makes directly accessing and decoding the memory chips a potential work- around if a pass code is enabled. There are two primary techniques, which provide direct access to the chips. Both are technically challenging. The two techniques are:
- Joint test action group (JTAG)
- Physical extraction (chip-off)
Both techniques are not only technically challenging and require partial to full disassembly of the device, but they require substantial post-extraction analysis to reassemble the file system. For these reasons, JTAG and chip-off would likely be the very last choices to circumvent a locked device.
With JTAG, you connect directly to the device’s CPU by soldering leads to certain JTAG pads on the printed circuit board (PCB). Then JTAG software can be used to perform a complete binary memory dump of the NAND flash, modify certain partitions to allow root access, or eliminate the pass code altogether.
In the chip-off procedure, the NAND flash chips are physically extracted from the PCB using heat and air. The chip, usually a small ball grid array (BGA) package, then needs to have the BGA connections regenerated and inserted into special hardware that connects to the chip and reads the NAND flash.
The advantages to these techniques are that they will work in any situation where the NAND flash is not encrypted. However, extensive research, development, testing, and practice are required to execute these techniques.